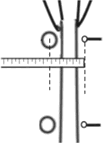
Crease Back of Neck
Fault
- Creases under collar at back of neck.
- Coat rides on shoulder ends and lifts collar away from neck at back and sides when fastened.
- Coat may ride above shirt collar.
Correction
- Pin up crease below collar.
- First pin to be placed at centre back, remaining pins to be placed each side of centre pin.
- Measure depth of crease at centre pin.
- Double this amount and enter on Alteration Docket.
Sloping Shoulders
Fault
- Collapses at back scyes.
- Sits low in neck.
- Collapses on front scyes.
Correction
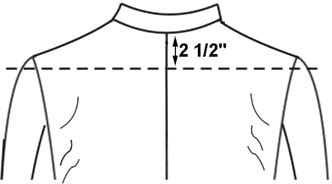
- Assess degree of fault by placing tape across back onto shoulder ends.
- Measure from top of tape to nape.
- Minus 2.5" from this measure to assess amount shoulder ends require picking up.
Tight Scyes
Fault
- Tight in front scyes.
- Tight in back scyes continuing under arm.
Correction
Indicate where tightness is felt, for example: front, or front and back scyes, etc.
RE-CHECK MEASUREMENTS AND FIGURATION

Short Back Balance
Fault
- Foreparts gape at bottom of jacket and do not run parallel.
- Skirt is shorter at back than front and stands away from seat.
- Diagonal creases at back of scye.
Vented Jackets;
Vents would cross and stand away from figure.
Plain back Jackets;
Back skirt would flute at seat area and stand away from figure.
To ascertain the extremity of this fault the following procedure should be adopted.
Correction
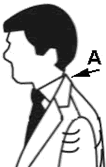
- Fit collar into neck correctly.
- Measure from top of shirt collar to top of jacket collar - measurement (A).
- Put hemline into balance.
- Measure from top of shirt collar to top of adjusted jacket collar - measurement (B).
- Difference between the two measures is the correction required.
Example Only
| Measurement (B) |
= 1.25" |
| Measurement (A) |
= 0.5" |
| Correction |
= 0.75" |
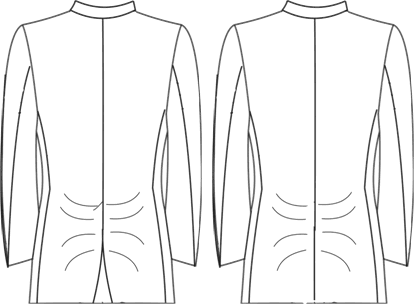
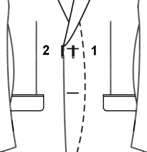
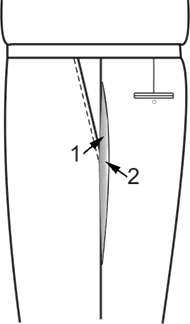
Long Back Balance
Fault
- Note gaping vent, this could be caused by customer standing erect. If jacket had no vent it would sit hard on seat and show diagonal fols on seat area.
- Front foreparts appear shorter than back.
- Foreparts overlap at bottom and appear too full.
Correction
- Starting at centre back seam on chest line, pin a fold of material until you have corrected the hang of the vent as shown.
- After checking the vent is hanging correctly, you wil be required to check the two remaining faults.
- Having satisfied yourself that all three faults have been corrected.
- Take a tape measure and, at the centre back seam measure the depth of the fold pinned (ie from pin to fold edge).
- Double the amount alteration docket.
Prominent Seat
Fault
- Gaping vent and horizontal creases across top of seat as illustrated.
- A plain back jacket will also sit hard on the seat causing creases to form horizontall across top of seat.
IN BOTH FAULTS 1 & 2 THERE WILL BE NO BALANCE FAULT
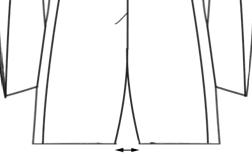
Correction
- If vented jacket measure extent of gape at bottom of jacket.
- For plain back jacket quote tight or very tight on seat. No measurement is required.
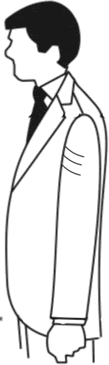
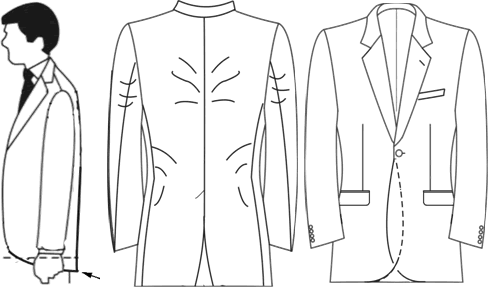
Sleeves Pitched Too Far Backward
Fault
Diagonal creases down forearm sleeves.
Correction
With the jacket fastened and customer's arms held in normal relaxed position, chalk on skirt immediately in front of the sleeve.
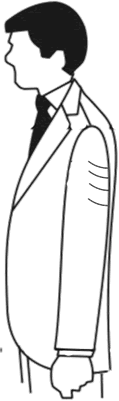
Sleeves Pitched Too Far Forward
Fault
'Horse shoue' creases at hindarm sleeves.
Correction
With the jacket fastened and customer's arms held in normal relaxed position, chalk on skirt immediately in front of the sleeve.
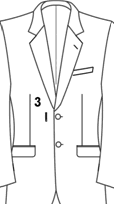
Small On Fronts
Fault
Foreparts will not meet.
Correction
- Place customer with his back to the mirror.
- Leave jacket in open position, making sure vent hangs correctly.
- Measure from shank of button to eye of button hole.
- Show this measurement on Alteration Docket.
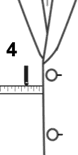
Large on Girth
Fault
You will note that the jacket is too large on the waist and seat with the balance of the jacket correct.
Correction
- Pin the jacket through both foreparts at the desired tension agreed by your customer.
- Mark where the edge of the over-wrap is.
- Fasten the jacket as normal.
- Measure from edge of jacket to mark to assess amount girth is to be reduced. Show this measurement on Alteration Docket.
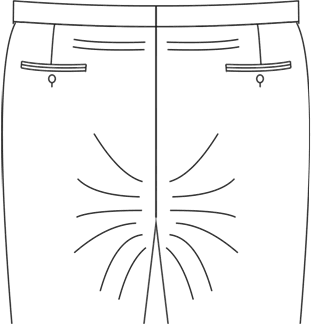
Long In Back Rise
Fault
Note how the creases form below the seat area and trousers appear low in fork.
Correction
- Lift surplus cloth away from seat and fork area.
- Pin this surplus under waistband until you have removed all signs of creasing.
- Measure depth of surplus pinned.
- Double this amount to assess alteration required. Show this measurement on Alteration Docket.
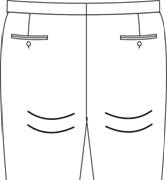
Tight In Fork
Fault
Tightness in base of seat and fork area.
Diagonal creases below seat.
This fault could continue under fork of trouser thus giving a tightness at base of the fly.
Correction
Check waist and seat measurements.
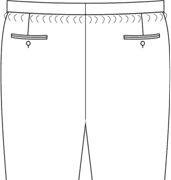
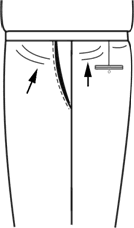
Large On Thighs
Fault
Large on thighs means there is a surplus of cloth on or around the top leg giving a baggy effect or a feeling of looseness at the back thighs.
Correction
- Pin away surplus cloth as shown
(on some occasions you may be required to pin above the bottom of the trouser pockets, but this will only be in extreme cases)
- When you have pinned away surplus cloth to the satisfaction of yourself and your customer, measure the depth of the fold pineed (at the thigh area).
- Double this amount. Show this measurement on Alteration Docket.
Trouser Waist
Fault: Big in waist
Take in trouser waist.
Correction
- re-check measurements.
- Pin up surplus in centre just below waistband.
Fault: Tight in waist
Let out trouser waist.
Correction
- Re-check measurements.
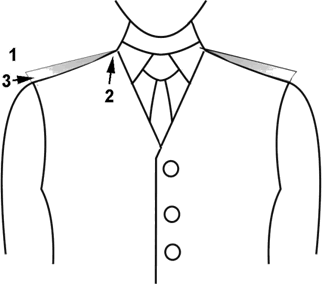
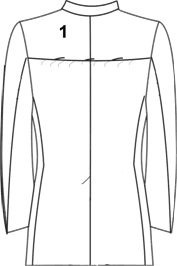
Creases on Front Shoulder
Fault
Creases on front shoulder.
Correction
- Pick up at shoulder seam.
- Pin into wedge shape, starting at shoulder end and tapering to neck until creases have been cleared.
- Measure depth of pinned up material at widest part of wedge.
- Double this amount and shown on Alteration Docket.
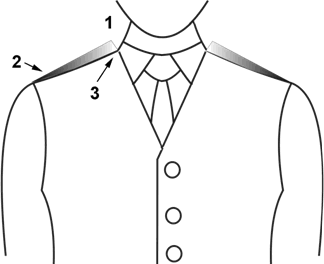
Opening Gapes
Fault
Vest opening gapes at both sides.
Correction
- Pick up at shoulder seam.
- Pin into wedge shape, starting at neck and tapering to shoulder until creases have been cleared.
- Measure depth of pinned up material at widest part of wedge.
- Double this amount and show on Alteration Docket.